Disclaimer: The content of this document relates to the Porsche 993 (911 1995 to 1998). I am not a professional automotive technician, and some of the opinions expressed in this document are just that, opinions; therefore, please feel free to use this document at your own risk. Many times, a lot can be learned by simply watching qualified professionals work on your 993
Door Card Panel Wrap -- The 993 has a wedge-shaped clipped-on insert on the door cards.
 This insert can be easily removed and wrapped in any number of fabrics, vinyl, or leather. This is a kitchen-table DIY project that only requires scissors and a staple gun. In my car, the driver's-side door wedge, wrapped in bright yellow leather, became stained and discolored over time from my forearms rubbing against it. It is now wrapped in yellow vinyl, where I hope its durability will improve.

Shift Boot Cover — Many owners report replacing their shift boots. This seems to be an expensive disassembly job.
 An outstanding upgrade is to just cut a somewhat triangle-shaped piece of leather or vinyl to form a cone-shaped cover for the existing boot. Making a trial pattern out of craft paper works quite well for defining the shape of the leather. I used 3M yellow weather adhesive to hold the seams together, and I made a hoop out of coat hanger wire wrapped into a glued hem at the bottom edge of the cone. This allowed the boot cover to snap right into the existing shifter well, right over the OE boot. Looks great, is completely reversible, and requires no disassembly!
Touching up wear and tear to leather accents:
I found that going to an art supply store, buying some squeeze tubes of artist's acrylic paint, mixing it to your liking for color, and adding some flooring paste wax to it makes a great leather damage repair dressing. I use it to fix fingernail scratches in my car's yellow leather-covered door cards in my 993, and after a few applications and buffing things up, the scratches disappear. For darker colors or even black leather, getting a color match should be straightforward.
I found that going to an art supply store, buying some squeeze tubes of artist's acrylic paint, mixing it to your liking for color, and adding some flooring paste wax to it makes a great leather damage repair dressing. I use it to fix fingernail scratches in my car's yellow leather-covered door cards in my 993, and after a few applications and buffing things up, the scratches disappear. For darker colors or even black leather, getting a color match should be straightforward.
Gauge Trim Rings -- I purchased these and went the extra step of buying a can of spray paint to color-match
 them and the ignition keyway cover to the body color of my car. One can buy exact color-match paint in a spray can online, or you can use a color available at your local home improvement store. I tacked each ring with three small dollops of GE silicone bath caulk. In doing this, less is more, and it has lasted for years without trouble.

Increasing front-seat legroom – If you or your passenger is over six feet tall, you may enjoy a little extra front-seat legroom. If you slip your finger under the front edge of one of the seat rails and you feel that the hold-down cap screw is installed in the forward-most screw mounting hole, you’re in luck! By unbolting the six bolts holding the seat rails down, one can slide the seat rails back by about an additional inch. By repositioning the rear threaded backing plates back an inch, so they will line up with the new hole positions, and you can just refasten the seat down, and you’re done. See “How to remove a front seat without drama” to avoid problems.
Body-color matching key fob housing-- Many folks have swapped out the switchblade key for a 944-style fob housing and the really nice '80s style key head. 

The circuit board inside the switchblade key housing fits perfectly in the 944 fob housing. I went one step further and found 944-style housings in various colors; now my Speed Yellow car has a yellow fob. How cool is that? The color fob housings are available on eBay.
 |
| The Rennline Mount |
The metal Rennline mount is a little expensive but seems to be very robust and is nicely made of machined metal.
A less expensive alternative is offered by Carpoint. It is stamped and formed sheet metal, and not as cleanly designed, but it should get the job done and is a lot less expensive.
Both products use a ring mount around the dashboard clock and provide a ball mount just to the side of the steering wheel. They can use either a magnetic phone mount or work with really any aftermarket cradle, such as those offered by WIZGEAR.
I tried the inexpensive 3D-printed plastic phone mount sold on eBay first, but found that its cradle mounting ball broke off with very little force applied, so I can't recommend it.
I tried the inexpensive 3D-printed plastic phone mount sold on eBay first, but found that its cradle mounting ball broke off with very little force applied, so I can't recommend it.
Making Modern 12 Volt Accessories fit in the old oversize cigarette lighter – The simple way is to wrap a rubber band around the neck of the plug before inserting it. However, if one is looking for a nice OE quality look and fit without modifying the dash or socket, just buy an all-metal dash replacement socket in the new, smaller size at your local auto parts store or on eBay. Discard the outer socket housing and cut the inner housing in half across its diameter. With a little bending and tin snips/file work, adjust the cut end of the barrel of the outward-facing half to create a metal slide-in liner that fits inside the existing outlet and stays in place.
Here is a posting on adapting a newer size plug into the larger older socket as found on a 993.
And here is another one discussing adding a 2nd switched outlet to your dash.
Adding a Dash Camera -- Now being over sixty years old, actuarial statistics come into play when I am involved in an accident. 99% of the time, I will not be found "at fault"; however, folks in the heat of the moment do lie about what transpired when involved in an accident. I find it interesting that the media now calls accidents crashes, as in some may truly be accidents, while others may conceivably be on purpose, go figure?
In any event, I found an effortless way to install a dashcam so its power supply wire does not dangle in my field of vision. First, buy a small dashcam, one that is attached to the glass behind the rearview mirror so you won't see it from the driver's seat. 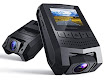

I purchased an inexpensive $40 Mini Dash Cam and was amazed at the range of features it has. This suggests to me that there is little benefit in buying a larger, more complex one. These things only have a year or two of service life before they get cooked from hot summer days, so making a big investment in one may not make sense. Then buy a 10-foot or longer pre-assembled power cable with the correct USB plug on one end for the camera and the standard "2.0 USB" plug on the other end to plug into a USB power outlet or power adapter. When in doubt, buy the slightly longer cable.
Then, once the camera is mounted to the window, run the power cable around the window to the passenger side door jamb, tucking it under the rubber window surround as you go. Then, continue under the dash and either use a USB power adapter in the cigarette lighter socket or an added switched power outlet in the dash or under it.
Recently I read about a fellow who captured a damage accident on his dash cam. As a witness, he told the folks at the scene he had it all on camera. Later, an insurance company called him and asked for it. He asked what they would pay for it. Ultimately, he handed them the original chip from his camera in exchange for a $1000 check.
Here is how one adds a switched power socket to your 993. The advantage of adding a switched outlet is that the camera will automatically start up when the ignition is turned on and shut down under its internal battery sometime shortly after the ignition is turned off, so you need not unplug it every time you get out of the car.
The camera also has a motion-detecting wake-up mode that may work in place of attaching it to a switched outlet, and will also allow it to run on its internal battery if woken up by an impact while your car is parked and unattended. I have not tried this feature. Be sure to mount the camera in a position so the windshield wiper blades pass in front of it on the glass, or it will not be too functional in the rain or snow.
Adding Cup holders – Where are you going to put that HOT cup of coffee? One of the first upgrades I added to my 993 was a cup holder.
 I purchased it from an interior guy in the UK. It is something that can be easily homemade if desired. Buy the plain between the seat console cup part# 964.552.159.00, then cut a cardboard cover for it in the shape of cup holes. Ideally, I would use a piece of art store 4-ply rag mount board for this (cotton fiber base). Wrap the cardboard cover in vinyl or leather using 3M molding/weatherstrip adhesive (black or yellow). Glue the finished piece to the top of the console cup.
Then remove the cassette or CD holder in your car and mount the cup in its place. If you already have the plain console cup, it can be unmounted via the screw under the pad in its base, and then it can be used to make this addition. Clearly, this is a Kitchen table kind of project.
Then remove the cassette or CD holder in your car and mount the cup in its place. If you already have the plain console cup, it can be unmounted via the screw under the pad in its base, and then it can be used to make this addition. Clearly, this is a Kitchen table kind of project.
Adding Heated Seats – It is shockingly easy to add the heated seat option to the 993 hardback seats,
 See Appendix “J” Heated Seats Shockingly Easy to add to Hardback Seats” to learn how to do it.

Cleaning up the look of the engine bay –The engine bay insulating blanket above the engine can look rather shabby over time. If you replace it with the OE service part, its edge will develop cracks in as few as 20K miles of use. If the blanket in your car is not falling apart, a good fix is to trim up the visible edge using a dry-wall edge cuff, sometimes referred to as J-Bead, from your local DIY store. Simply cut a suitable length and fit it in place. If you want to get fancy, you can fit it with the longer edge facing up and use the buttons that hold the edge of the blanket in place to firmly tie it down. In my case, I just force-fitted it with the shorter edge face up, and it seems to stay in place just fine. Once trimmed to size, it can be painted flat black as I did or really any color, including body-matching color. Takes about five min. to fabricate, with a total cost is just $8 or so, including paint, and it looks quite nice. If you are not DIY inclined, a nice premade product can be found here.
Protecting the frunk hood from impact damage from inside the frunk. -- I had a 1986 Carrera where the previous owner accidentally closed the hood over some items that didn't fit in the frunk. The result was outward protruding body damage,
 |
| The Das Schild |
Not bad, but it was visible every time I looked over the hood. For my 993, I purchased a Das Schild interior hood liner. It also provided a mounting point to add a frunk light in the front and center of the underside of the hood, where it should have been in the first place.
Improving the illumination inside the frunk--
 |
| A Dome Light Fixture |
- A simple, low-tech way to increase the effectiveness of the existing frunk lamp is to add a reflective adhesive-backed sheet to the underside of the frunk lid. One can do this in conjunction with swapping out the frunk incandescent bulb with a much brighter LED-based bulb. I have not done this, so there will be a little experimentation in order to see if the LED lamp interferes with the alarm/immobilizer functions.
- A highly effective solution is to place a LED dome lamp on the front edge center, underside of the hood, attach it to a Das Schild hood liner, and run the wire above the liner to the original incandescent frunk light. This new location does a much better job of illuminating the entire frunk from above versus the poorly located OE fixture that, at best, only illuminates the frunk indirectly.
- When doing this, be sure to lock the frunk latch with a screwdriver and lock the doors with your fob. In doing this, the frunk light will be unpowered, allowing one to;

Dome Light In Action - Pull the existing fixture and attach the added wires without the risk of shorting anything out.
- Since the added light is a LED fixture, it draws very little current but has to be attached so its negative wire attaches to the brown striped negative wire on the fixture, and the positive to the other wire to the existing fixture to illuminate.
- Attaching the added wires is very easy. I just pulled the female spade connectors off the original fixture.
- Thread the added stripped wire ends through the holes in the male spades on the fixture and;
- Slip the female spade wire connectors back onto the fixture, pinning the added wire in place. The key to a clean connection is. when adding the wire. Make the stripped wire ends long enough to thread through the hole and get pinned by the original wires' female spade, but short enough that the wire's stripped end is completely covered by the spade connector when it is slid fully back on the fixture. I also added a little optional electrical tape between the connectors as added protection against grounding out the connection spades when snapping the fixture back into the body.

 |
| I haven't changed a tire recently, but when I do... |
of the road in quite some time, but when I do, I will be very glad I added some illumination to the frunk!
Replacing seat upholstery - I replaced the leather seat upholstery on the hardback sports seats in my car. This is an advanced DIYer project well suited to workers who can work slowly and methodically. To review my experience with this, see Appendix “K”.
LED Marker/Turn/Stoplights - When upgrading incandescent marker/turn/stop lamps on a 993 to Light Emitting Diode (LED) based lights, be aware that you will be adding complexity:
LEDs draw substantially less current than a bulb, and unlike a bulb, current passing through a diode only goes in one direction, called the forward direction. Unlike an incandescent /resistive load bulb, current trying to flow in the reverse direction sees an open circuit when it encounters a diode. For one of these two reasons, replacing an incandescent bulb with a diode can cause the stop light circuit to behave badly by disabling the cruise control.
Reported issues that have workarounds posted on internet boards related to LED upgrades include:
- The high-mounted LEDs stop light illuminating very faintly with ignition-on while not pressing the brake, this could be called a feature, not a bug by some.
- When tail brake lights are converted to LEDs, the cruise control ceases to function. If a ballast resistor is added to the stoplight circuit, adding back a resistive load seems to resolve this issue.
- The fix can be purchased from https://www.bergvillfx.com/, This solution stays cool, but has been frustrating for some to get it to work.
- Or a suitable high-wattage resistor with an ohm value equal to the load provided by one or two stoplight filaments can be purchased on eBay to get the job done. Placement of the DIY resistor is very important in that it will get hot at times.
- The simplest alternative is to retain the incandescent bulbs for the rear stoplights only.
Be aware that replacing the remote fob warning or seatbelt warning incandescent bulbs in the dash clock with LED illumination will cause these systems to throw an error code and illuminate the warning light. So these two lights in the dash are not candidates for LED conversion.
If you found this page informative, return to the main page and bookmark it for future 993-related servicing, repair, and upgrading guidance & information. If it made you smile, consider a donation through the button on the top left margin of this page.
Herr Andy -
ReplyDeleteAs always, Vielen Dank! Fond memories; Your DIY How-To add "seat heating" function brought back memories when ordering the 993 S. Having checked options 373/374 w/heat delayed my production date by 75 days. With heat was the issue ... Needless to say I waited. Fast forward,,, Who-da Thunk "heat" was so easy..Many thanks for the exhaustive work prepairing your concisive DIY tutorials. Refer the DIY often.
Have a great day ..
Cheers, M/S