
The entire purpose of the Supplemental Air Injection (SAI) system is to inject a small amount of fresh air into the exhaust system so it may burn any unspent fuel that has made its way into the exhaust at startup due to incomplete combustion. This is why its air pump only runs for a few seconds when first starting an engine from a dead cold state. It has no impact on the performance or durability of the engine if it is not working but will present a Check Engine Light (CEL) on OBD-ll cars and therefore can result in failing an emissions inspection.
The Check Engine Light (CEL) – IF the secondary air injector ports are reported by the On-Board Diagnostic system (OBD) as clogged. This issue need only be addressed on 1996 forward OBD-II equipped cars where the emission control system reports air injector status once the Readiness test or tests are complete.
The OBD-I 1995 and earlier cars suffer from the same fault, however;
- It is not reported by the OBD-I system;
- It has no influence on engine performance or durability;
- It had no influence in passing a tailpipe emissions test, and;
- The Check Engine Light (CEL) does not illuminate.
For these reasons, it requires no action on the part of the OBD-1 car owner to rectify. Ignorance is bliss as they say? Some go ahead an pull the related fuse to disable the air pump if they find it has become noisy.
I would think the easiest way to tell if the SAI system is working on an OBD-1 993 or 964 is to take a sniff at startup. If you don't smell the sweet smell of alcohol or that savory smell of other unburnt hydrocarbons at the tailpipe it is probably working. Make sure no one is watching you do this as it may end up as a humorous video on social media. Didn't Edward Bulwer-Lytton in 1839 say "The nose is more powerful than the oxygen sensor", or something like that? On the other hand, if the check valve is original to the vehicle and one is inclined to they can address the items listed below.
- Verify all your oxygen sensors are functioning properly to avoid erroneous reporting of this issue. If unable to diagnose oxygen sensors' health and any are original to the car just replace any for the bank that reports OBD problem codes. the sensors are relatively inexpensive if purchased in a BOSCH box versus a dealer part and are one of the easier DIY projects to replace.
Instructions for replacing sensors are listed at the bottom of this page.
Using an evaluation of the signal from the Oxygen Sensors to validate the SAI system for proper operation at start-up may be problematic. Old sensors take longer to warm up and light off (begin to operate properly). In such cases, the immediate period of the SAI start-up test may have passed before the Oxygen Sensors send reliable information triggering a Check Engine Light (CEL). Looking at the output data once the engine has been running for a minute or two will show the faulty sensors working correctly even though they may not have been at the beginning of a cold start.
- Replace the secondary air injector check valve, see below on how to do this;

- Verify the operation of the air pump and vacuum-controlled valve attached to its hose and the control valve's vacuum control solenoid. This is best done when replacing the check valve with the check valve's hose disconnected the rather loud sound of the air pump through the vacuum-controlled valve to this hose can be easily heard at an engine dead cold restart as it runs for a few moments. Since it may only run for a few moments, have a friend start the car while you are positioned over the engine to immediately hear the pump running. It will not run on a 2nd restart.
- Alternatively, if your OBDC reader supports device actuation, as Durametric does, one can turn on the blower to hear it run, although this will validate that the blower is running I am not sure if the vacuum-controlled air valve attached to the pump's outlet hose is opened as well. So if you want to validate that the valve is working you may need to go the cold-start route.
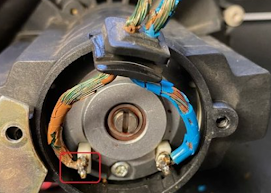
- Verify that the caps on the sides of the casting the check valve is threaded to are intact, not rusted through, and leaking air. See the rusted-through cap on the lower left of the picture to the right;
- Clear the code(s) with your reader and see if they return. Nine times out of ten they won't.

- Remove the exhaust manifold & SAI check valve and clean the passages/ports with a wire snake made from a bicycle brake cable attached to a hand drill. Slip the cable from below into each port while flushing with carb cleaner through the base of the check valve above. Others have had success cleaning and flushing the ports using the wire snake and shooting the cleaner into the ports from below using the extension tube that comes with the spray solvent. In this case, clean the port until clear solvent runs from other ports on the same side of the engine. To me, the above methods are the only effective, legal, and reasonable cost approaches to resolving clogged injector ports;
- Here is a short video demonstrating how to clean the ports. In this video, the presenter appears to not use an electric drill. He just used the cable as a brush moving in and out of the ports by hand:
https://www.youtube.com/watch?v=bvwgv6KrE4g
OBD-II 993 owners have tried all of the below very creative ways to resolve the return of the check engine light all of them either don't address the emission issue, are illegal, unnecessary, or prohibitively expensive:
- Add electronics so engine management thinks the clog does not exist, something that is not legal as well as being a disclosure issue when you sell your car, also a DIY item or;
- Disassemble the engine to clean the ports/passages and replace the valve guides, sometimes part of what is called a top-end rebuild. A solution that is never needed to strictly address clogging. An exorbitantly expensive $8,000 to $12,000 dollar procedure that is almost never needed for any reason for a 993.
- Clear the OBD injector code and run through a prescribed driving procedure that triggers three or four of the five emissions-related READY codes needed to make the car pass emission inspection in some states. Although in many states this option will allow you to pass an inspection, it will not extinguish the Check Engine Light. It will work and is legal to the letter of the law, if not its intent. Involves a sort of extended driving Tango-dance every time one needs to get their car's emission tested.
- Rerouting air injection from the check valve through tubes directly to the pre-catalytic converter section of the exhaust system. Kind ‘a like heart bypasses surgery for your emissions system! I always wondered why my car's exhaust system had extra oxygen sensor bungs (ports) along its pipes with plugs screwed into them. Now it all makes sense, kind ‘a like someone at Porsche foresaw problems with the air injector system and pre-installed attachment points for a fix that preserves the integrity and function of the secondary air injection system. Gosh, who would think! Although this option will probably provide an emission control function most states do a visual inspection where this option is a form of tampering with the emissions system, so a no-no in all states unless you get the fix certified by the Federal EPA for a kit that does this. Something some enterprising engineer hasn't done yet.
Here is an interesting anecdotal experience from a posting on passing an emissions test I found recently on Rennlist:
"I negotiated [the purchase of] a 97 C4S that" "after [it] basically sitting for 18 mos (~500 miles in 2 yrs)""would not pass emissions." "Drove it every day for a month and " "Passed emissions without any issues" (text consolidated for clarity)
Apparently letting a car just sit too much can influence emissions, also, a bad air check valve, leaking air hose, faulty air pump, or deteriorated wires, a known issue, (see below) on the backside of the engine leading to the air pump can also cause the same light to come on.


Alternatively, wires and wire sheaths from an old discarded oxygen sensor can be used, In this case, the wire may need to be doubled up to provide adequate current carrying capacity when used.
 |
| Pelican's exact fit wrench |
 |
| Generic Crowfoot |
(SAI) check-valve has a relatively short service life. If it starts to leak it may cause or accelerate the clogging of the air injector ports adjacent to the exhaust valves in the engine a bigger and potentially more expensive issue to sort out. For this reason, I would replace it every three or four years regardless of miles as it corrodes internally possibly unrelated to miles driven while the exterior of the valve remains bright and shiny. It is a pain to remove the originally installed valve at this point with various methods depending on how badly its mounting threads are corroded
 |
| Internal Corrosion |
The conventional removal of choice is to use a crowfoot wrench on the hex under the valve pictured above. Purchasing a 27mm thin profile crowfoot wrench that has the proper shape for the clearance needed to slip under the valve can be a challenge. Some end up applying a grinder to a crowfoot wrench to adjust its shape to gain the necessary clearance.
- Pelican Parts sells an SAI kit including a properly dimensioned crowfoot wrench.
- Also, Red Cap Garage sells the wrench as well as a stand-alone item,
If the valve is replaced regularly a crowfoot works well. In my case, with a very old valve, the mounting threads were frozen and I could see the manifold it was attached to flexing when I attempted the removal of the valve using a crowfoot wrench. I didn't want to risk cracking the manifold making the valve's removal a much bigger more expensive job.

So I took a more heroic approach soaking the valve with spray PB Blaster acidified penetrating oil overnight and using an impact wrench-mounted steel hole saw to drill through the top of the valve and ultimately drilling the body of the valve clean off its hex mount. A sort of Dirty Harry approach, I like Dirty Harry. This left the hex exposed allowing for its easy removal with an impact wrench and the appropriate regular hex socket. Using an impact wrench that shocks the threads is key to removing it vs using a hand wrench that applies more constant torque that in some cases may damage the manifold casting it is screwed into before the threads release. An electric or air impact wrench is an inexpensive item at Harbor Freight.

My method is probably not the first method of choice but is the choice if the valve is being a real "punk" to remove. It certainly is the final method and doesn't involve "feeling lucky" to get the job done. Once removed using a little anti-seize will "Do-Ya" on the replacement valve's threads, adding a crush washer under the hex, and not over-tightening the valve will make subsequent removal less heroic in a Dirty Harry, antihero kinda way.
In some states, the emission regulations do not require emissions inspections on cars greater than 25 years old. As our cars pass through this threshold some just disable the SAI system. This works well for the OBD-l cars by simply pulling a fuse but will require adding some electronics to cause the Check Engine Light to not illuminate on OBD-II cars. It may just be simpler to clean the system. Also, tampering with the system may not sit well with a buyer of your car sometime in the future.
A Leaking Carbon Canister:
A separate minor issue that comes up occasionally with
the emission control system is with the charcoal canister or the hose leading to it. It is part of the gas tank venting system. If leaking one may find black charcoal dust on the ground under it. It is located on the left side of the car under the forward section of the rear wheel well.
A Leaking Carbon Canister:
A separate minor issue that comes up occasionally with
 |
| Charcoal dust on the ground. |
The canisters is expensive to purchase but can be rebuilt.
It can be sliced open, filled with new activated charcoal and the filter cloth inside can be replaced. It can then be glued back togeather using ABS/PVC compatible plumbers cement.
 |
| Carbon Canister |
Be sure to never top off the tank with fuel to avoid saturating the canister with fuel and inducing fuel odors when driving the car.
#OBD #OBDC #OBDC-II #On board diagnostic
#208 #P1411 #80 #P0410 #CEL #SAI #airpump #checkvalve
No comments:
Post a Comment