
Earlier year production Porsche 993s do not have an illuminated ignition keyway.
Most of these cars have a black dash and at night it can be difficult to see the ignition keyway to insert the key. There are lots of aftermarket 12-volt bulb or LED panel indicator lights that can be mounted above the keyway to provide illumination. Below is how to install a keyway light into one of these cars using a factory bulb holder or just an aftermarket lamp or LED. One can install an incandescent bulb as original or update the install using a pre-wired bare white or yellow 8mm or 10mm LED with the original Bulb Holder.
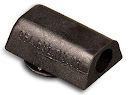
The picture at the top of this page is of an installed aftermarket narrow beam spotlight LED. Other styles of lamps will produce different visual effects. Be aware raw LEDS, panel lamps, and bulbs come with a selection of beam angles sometimes referred to as viewing angle or even some produce diffuse illumination. This will result in a more or less directional illumination effect. This may influence your decision as to what lamp to use and the exact placement of the light source through the dash.
The picture at the top of this page is of an installed aftermarket narrow beam spotlight LED. Other styles of lamps will produce different visual effects. Be aware raw LEDS, panel lamps, and bulbs come with a selection of beam angles sometimes referred to as viewing angle or even some produce diffuse illumination. This will result in a more or less directional illumination effect. This may influence your decision as to what lamp to use and the exact placement of the light source through the dash.
- Porsche Part number 964 632 113 01 Bulb holder Ignition
- Porsche Part Number N 017 751 2 bulb 1.2 Watt
- Porsche Part Number 999 632 014 00 Bulb electrical socket fits in holder Ignition
- A short length of 18 gauge stranded primary wire
- A few small tie-wraps & some 3M type 33 or 88 electrical tape
- Two Scotchlok wire splices
- Solder and soldering iron if you desire to solder the wire tap-ins

Parts needed for a LED upgrade install using the factory bulb holder:
- Porsche Part Number 964 632 113 01 Bulb holder ignition starter lock
- A bare 8mm or 10mm Prewired 12 Volt LED from eBay

- A short length of 18 gauge stranded primary wire
- A few small tie-wraps & some 3M types 33 or 88 electrical tape
- Two Scotchlok wire splices
- Optional - Solder and soldering iron if you plan to solder the wire tap-ins

Parts needed for installing a generic panel lamp install using aftermarket parts:
- A small LED 12-Volt panel indicator lamp with housing and pigtail (eBay)
- A short length of 18 gauge stranded primary wire
- A few small tie-wraps & some 3M type 33 or 88 electrical tape
- Two Scotchlok wire splices
- Solder and soldering iron if you desire to solder the wire tap-ins

- On the 993 the frunk light is illuminated along with the dome lights in the cabin.
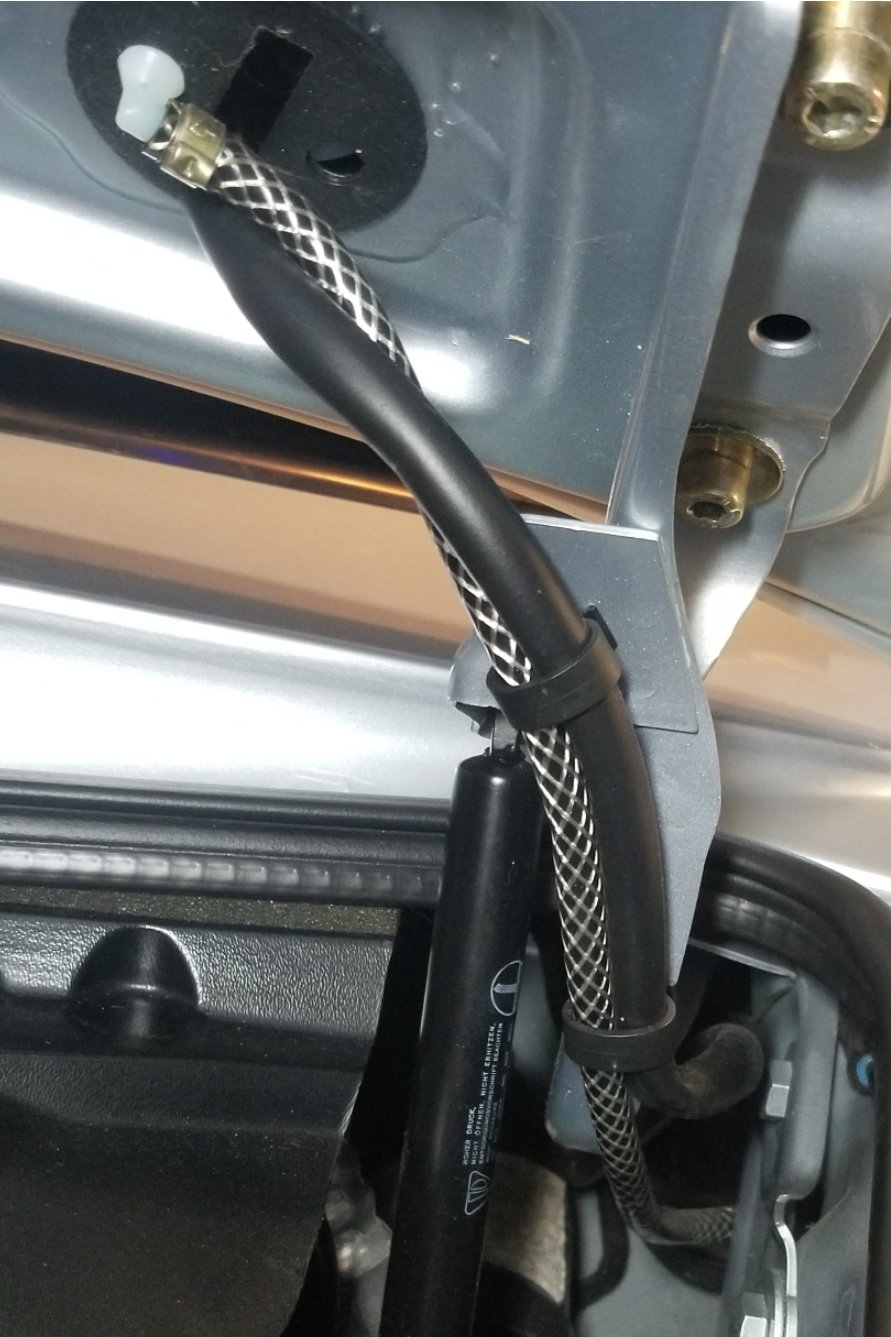
- The wires powering the frunk light run up the hinge arm on the driver's side of the car for LHD cars. This circuit location is where the tap-in is easily done
The procedure:
#Alarm #fob #door lock #immoblizer #ignition kill #led flashing, #remot #entry #lighting
- Cut power to the frunk light circuit:
- Open the Frunk and use a screwdriver to press down on the lid latch to lock it triggering the switch that is part of the latch.
- Close the cabin doors to the car and lock the car with the fob. The Frunk light should go out.
- The idea here is to make sure the frunk lamp is unpowered as you tap into its wires. Alternatively, you can pull its fuse or disconnect the car battery.
- Add two or three feet of stranded automotive 18 or 20 gauge primary wire to the two connections on the bulb socket or LED pigtail depending on which you plan to install;
- Mount the light fixture with the bulb and wires attached to the underside of the gauge cluster above the ignition keyway. To do this
- Remove one of the gauges to access behind the gauge cluster;
- Punch a small hole in the vinyl dash cover where the steel behind it has a cut-out and gently position the fixture so its lamp opening or lens protrudes through the vinyl cover.
- Then thread the wire behind the dash to the driver side frunk hinge mechanism. It may be helpful to use a fish tape to facilitate what you are doing.
- Trim the excess length of the wires and splice the two wires into the two wires that run up the hood hinge arm and lead to the frunk light on the underside of the hood.
- To do this make a two or three-inch lengthwise slit in the upper end of the black rubber sheath running up the hinge arm containing the wires to the frunk light.
- The red wire leading to the lamp on my car is the positive wire, the Brown & White wire is the negative.
- When adding the keyway lamp wires along existing wires I like to stagger the tap-ins so their position along the existing wires doesn't overlap. This is is to avoid possible future shorts and also avoiding concentrating the insulating tape or 3M splice bulk in one spot. To accomplish this tap into the two wires an inch or two apart along the length of the wire bundle.
- For the LED solution it is important that the positive lead from the LED goes to the positive power wire leading to the frunk light otherwise the LED will not illuminate. I like to solder splices for reliability or since the current load is very low in this application Scothlock splices can be used;
- Insulate as needed with Scotch 33 or 88 electrical tape and tie things down as needed with small tie-wraps. Tie-down the wires so they can freely move with the hood as it is opened and closed. I strongly suggest using the 3M tapes as they will tend to not break down and unravel with age or temperature cycling as other brands of electrical tape will.
- Pull the hood release to unlock the frunk latch before attempting to close the frunk
If you found this page informative return to the main page and bookmark it for future 993 related servicing, repair, and upgrading guidance & information.
#Alarm #fob #door lock #immoblizer #ignition kill #led flashing, #remot #entry #lighting
No comments:
Post a Comment